Learn how to embed content directly on your website below.
View the Benefits and Limitations before you begin.
Benefits
- embed directly on your website using HTML
- lightweight
- out of the box, simple integration
Limitations
- look and feel is determined on settings you configure in the yawave application, not your CMS or webiste
Embed Code Directly on Your Website
-
First you'll need to create an API Connection. To do this, click Administrate/Integrate/Connections.
-
Click Add Connection.
-
Click Embed&API.
-
Click Set This Up.
-
Enter the name you want to use for the connection in the Name field.
-
Enter the domain you are using the plugin on in the Domain field. Note: You must include https:// in front of your domain.
-
Click Create.
-
Click Publish/Portals.
-
Locate the Portal you want to embed.
-
Click the three dot menu in the top-right of the Portal you want to embed and select Embed.
-
Click the Connection drop-down menu. If you have previously created a connection you want to use, select it from the drop-down menu. If the connection you want to use is not available, follow the instructions below:
- Click +Add Connection.
- Enter the domain you are using the plugin on in the Domain field. Note: You must include https:// in front of your domain.
- Click Save.
- Journey and Touchpoint are optional and require more advanced understanding of the Yawave product. If you are already familiar with these settings and how they work, complete the following, otherwise continue to Step 13.
- Select a Journey from the drop-down menu or select Add Journey to create a new one.
- Enter the name of the Journey in the Journey name field.
- Select the Visibility you want to use for the Journey from the Visibility drop-down menu.
- Click Save.
- Select Add Touchpoint from the drop-down menu.
- Enter the name of the Touchpoint in the Touchpoint name field.
- Select the Visibility you want to use for the Touchpoint from the Visibility drop-down menu.
- Click Save.
-
Click Next.
-
Configure the following settings. Note: When changing configuration settings you'll see the changes in real-time.
- Under General:
- Primary Color
- Secondary Color
- Background
- Under Portal Header:
- Show Cover
- Custom height (px)
- Name
- Description
- Thumbnail
- Under Portal Body:
- Categories panel
- Calendar button
- Number of columns
- Layout style
- Under Post:
- Style
- Cover corner radius (px)
- Image
- Title
- Description
- Date & Author
- Category & Subcategory
- Views & Activities count
- Share panel
- Under Fonts:
- Paragraphs
- Font Family
- Variant
- Headings
- Font Family
- Variant
- Paragraphs
- Under Button:
- Buttons
- Background
- Icons, typography
- Buttons
-
Click Next.
-
Configure the following settings. Note: When changing configuration settings you'll see the changes in real-time.
- Under Header:
- Show Header
- Show Header Collapsed
- Categories
- Under Tools:
- Engage Toolbar
- Under General
- Background color
- Publication Landing
-
Click Next.
-
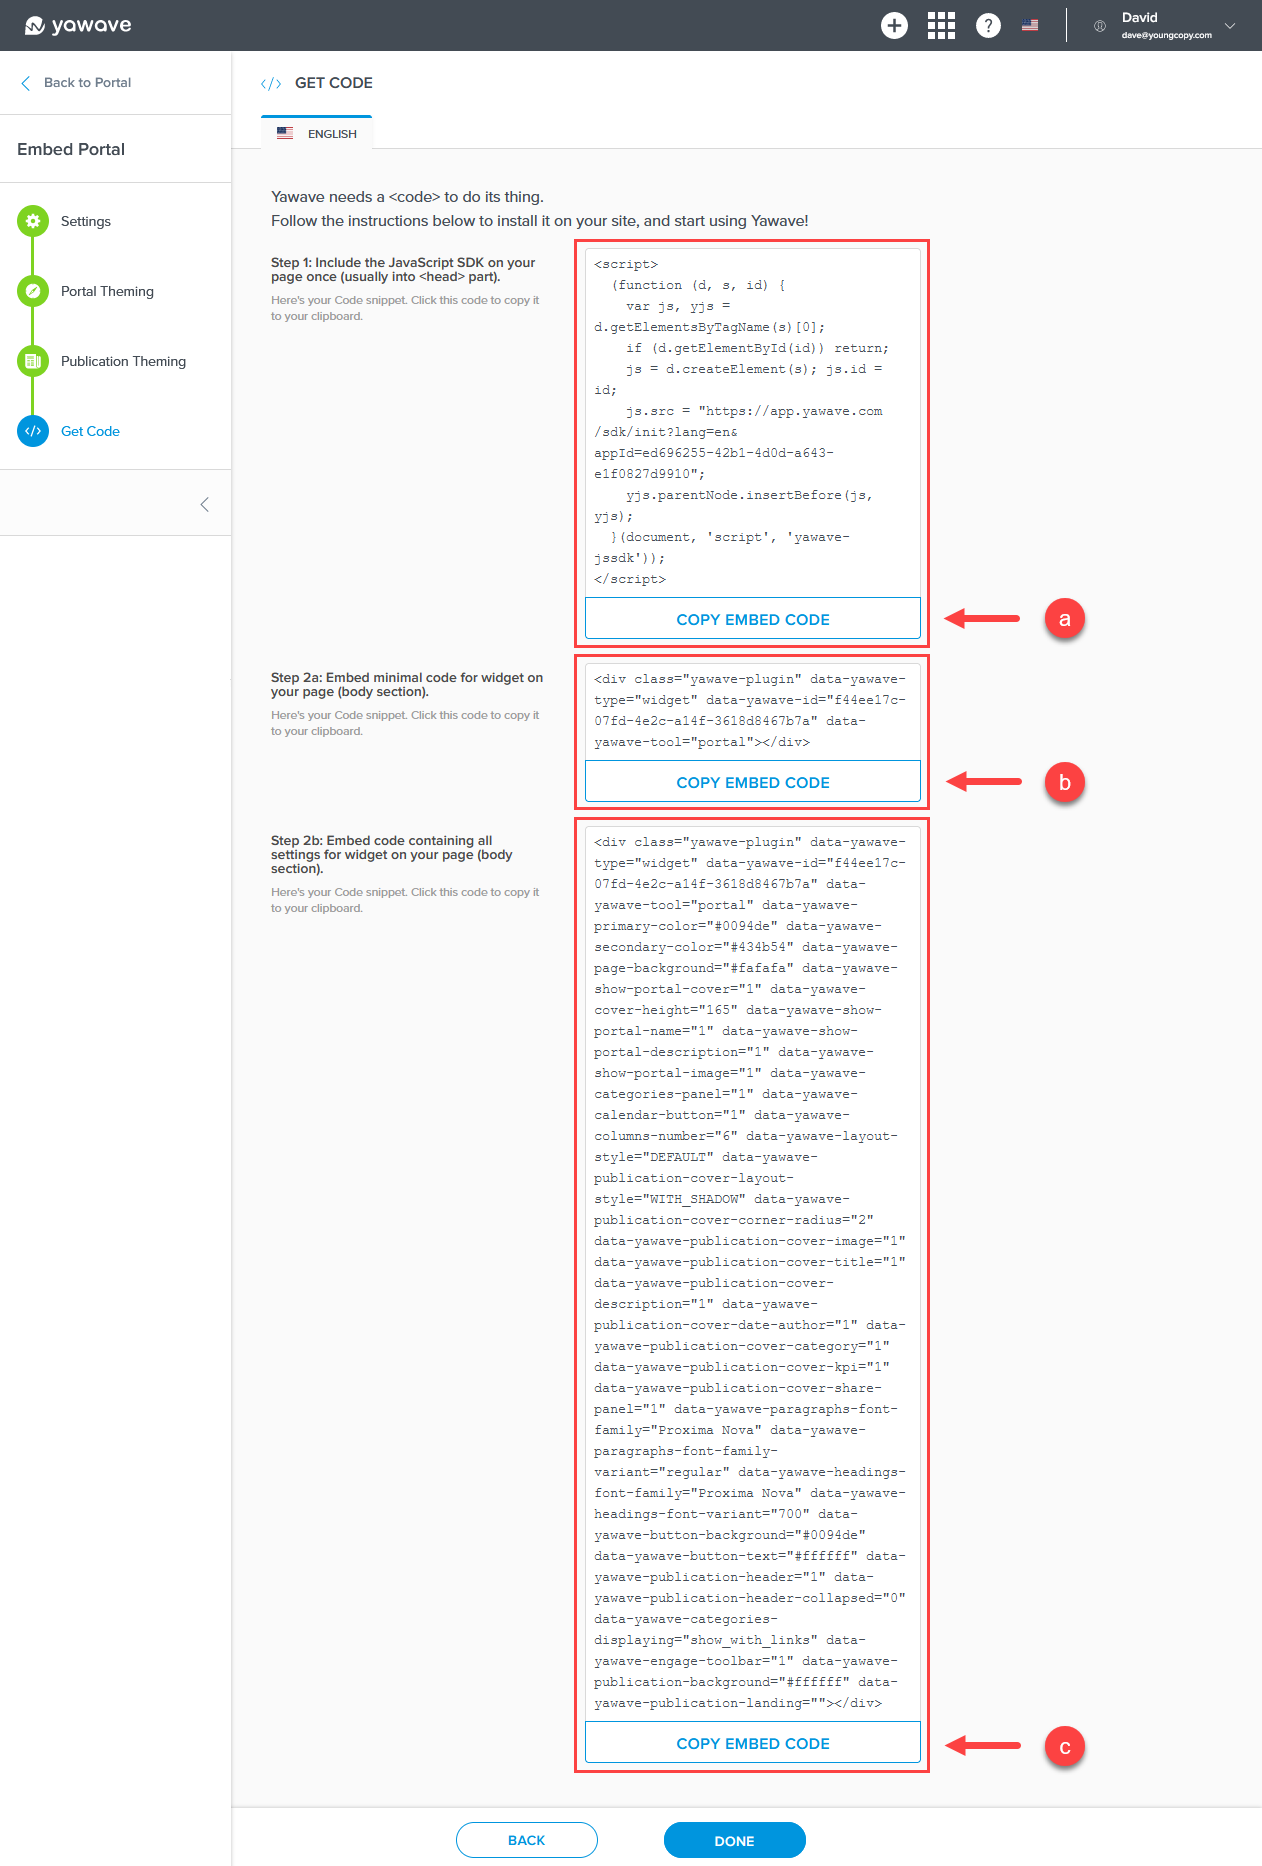
Follow the instructions to copy and embed the Yawave generated code based on the configuration settings you chose in the steps above. Alternatively, we provide more detail below:
- For Step 1 in the onscreen instructions, click Copy Embed Code (a) and place the code in the head part of the website or application where you are embedding your Portal.
- Step 2a and Step 2b in the onscreen instructions give you two options. Click Copy Embed Code (b) if you want to use the settings you configured above or click Copy Embed Code (c) if you want to override what you configured above. Step 2b gives you more control. For example, you can manually change any of the embed code to the configuration settings you want. Place the code from Step 2a or Step 2b in the body of the website or application where you are embedding your Portal.
- When completed, click Done.