Learn how to embed a Tool by using the example of a Share Tool below.
This article assumes you have created a Share Tool already. If you haven't, follow the Create a Share Tool instructions.
Also note...
Regardless of whether you use the Pop-Up builder or Widget builder, Yawave does not save your configuration settings. If you need to change a configuration setting you'll need to go through the builder again. Alternatively, you can modify the embed code once you get to the onscreen instructions containing the embed code.
You can embed a Share Tool in two ways:
- Pop-Up
- Widget
Decide on how you want to embed your Share Tool and follow the instructions below.
Embedding as a Pop-Up
-
Click Administrate/Tools/Share Tools.
-
Click the three dot menu of the Portal you want to embed and select Embed. Note: The three dot menu is located on the far-right of your Share Tool.
-
Click Pop-Up.
-
Configure Settings as follows:
- Share Tool - The Share Tool you selected in Step 2 above should be selected for the Share Tool value. This is the default setting and cannot be changed.
- Share Channel - This setting allows you to connect the Share Tool to a custom social media button such as Facebook, LinkedIn, Twitter, and more. Choose the Share Channel you want to connect your pop-up to from the Share Channel drop-down menu. Or leave this setting as the default First Active Channel.
- Connection - Select the connection you want to use for the Connection field. Learn more about Connections in the Create a Connection instructions.
- Publication - By default Publication is set to Autocreate publication from URL. This default setting is used when you want to create a Publication using the meta data from the page you are embedding the Share Tool Pop-Up embed code. When Autocreate publication from URL is selected, the following options are shown:
- Publication to be copied - Currently this setting does need to be configured and can be left as default.
- Ignore URL Parameter for Autocreation - By default, this setting is toggled On. This means only one Publication will be created and the URL parameters will be the same for the created Publication. When this optin is toggled Off, multiple Publications will be created with different URL parameters. It is recommended to leave this option as the default setting.
- Category - If you haven't created a Category, it will not be shown in the drop-down menu.
- Tags - If you haven't created a Tag, it will not be shown in the drop-down menu. Here's how to create a Tag:
- To create a Tag, click Administrate/Classify/Tags.
- Enter the name you want to use for the Tag in the Name field.
- The Slug field is automatically created when you enter a value in the Name field. You can change the slug to another name if needed.
- Click Create Tag. Note: You can create as many Tags as you need.
- Journey - This setting is optional and requires more advanced understanding of the Yawave product. If you are already familiar with these settings and how they work, select a Journey from the drop-down menu or select Add Journey to create a new one.
- Touchpoint - This setting is optional and requires more advanced understanding of the Yawave product. If you are already familiar with these settings and how they work, select Add Touchpoint from the drop-down menu.
- Link to landing page - The landing page is always the same URL as the page where you place the Share Button. In most cases this setting can be left as default.
- Link to referral page - The landing page is always the same URL as the page where you place the Share Button. This setting is specifically used when the page is shared in an email. In most cases this setting can be left as default.
-
Click Next.
-
Configure the following settings. Note: When changing configuration settings you'll see the changes in real-time.
- Under Motivation Part Settings:
- Show Motivation part
- Powered by yawave
- Link button
- Under Share Part Settings:
- Color
-
Click Next.
-
Follow the instructions to copy and embed the Yawave generated code based on the configuration settings you chose in the steps above. Alternatively, we provide more detail below:
- For Step 1 in the onscreen instructions, click Copy Embed Code (a) and place the code in the head part of the website or application where you are embedding your Share Tool.
- Step 2a and Step 2b in the onscreen instructions give you two options. Click Copy Embed Code (b) if you want to use the settings you configured above or click Copy Embed Code (c) if you want to override what you configured above. Step 2b gives you more control. For example, you can manually change any of the embed code to the configuration settings you want. Place the code from Step 2a or Step 2b in the body of the website or application where you are embedding your Share Tool.
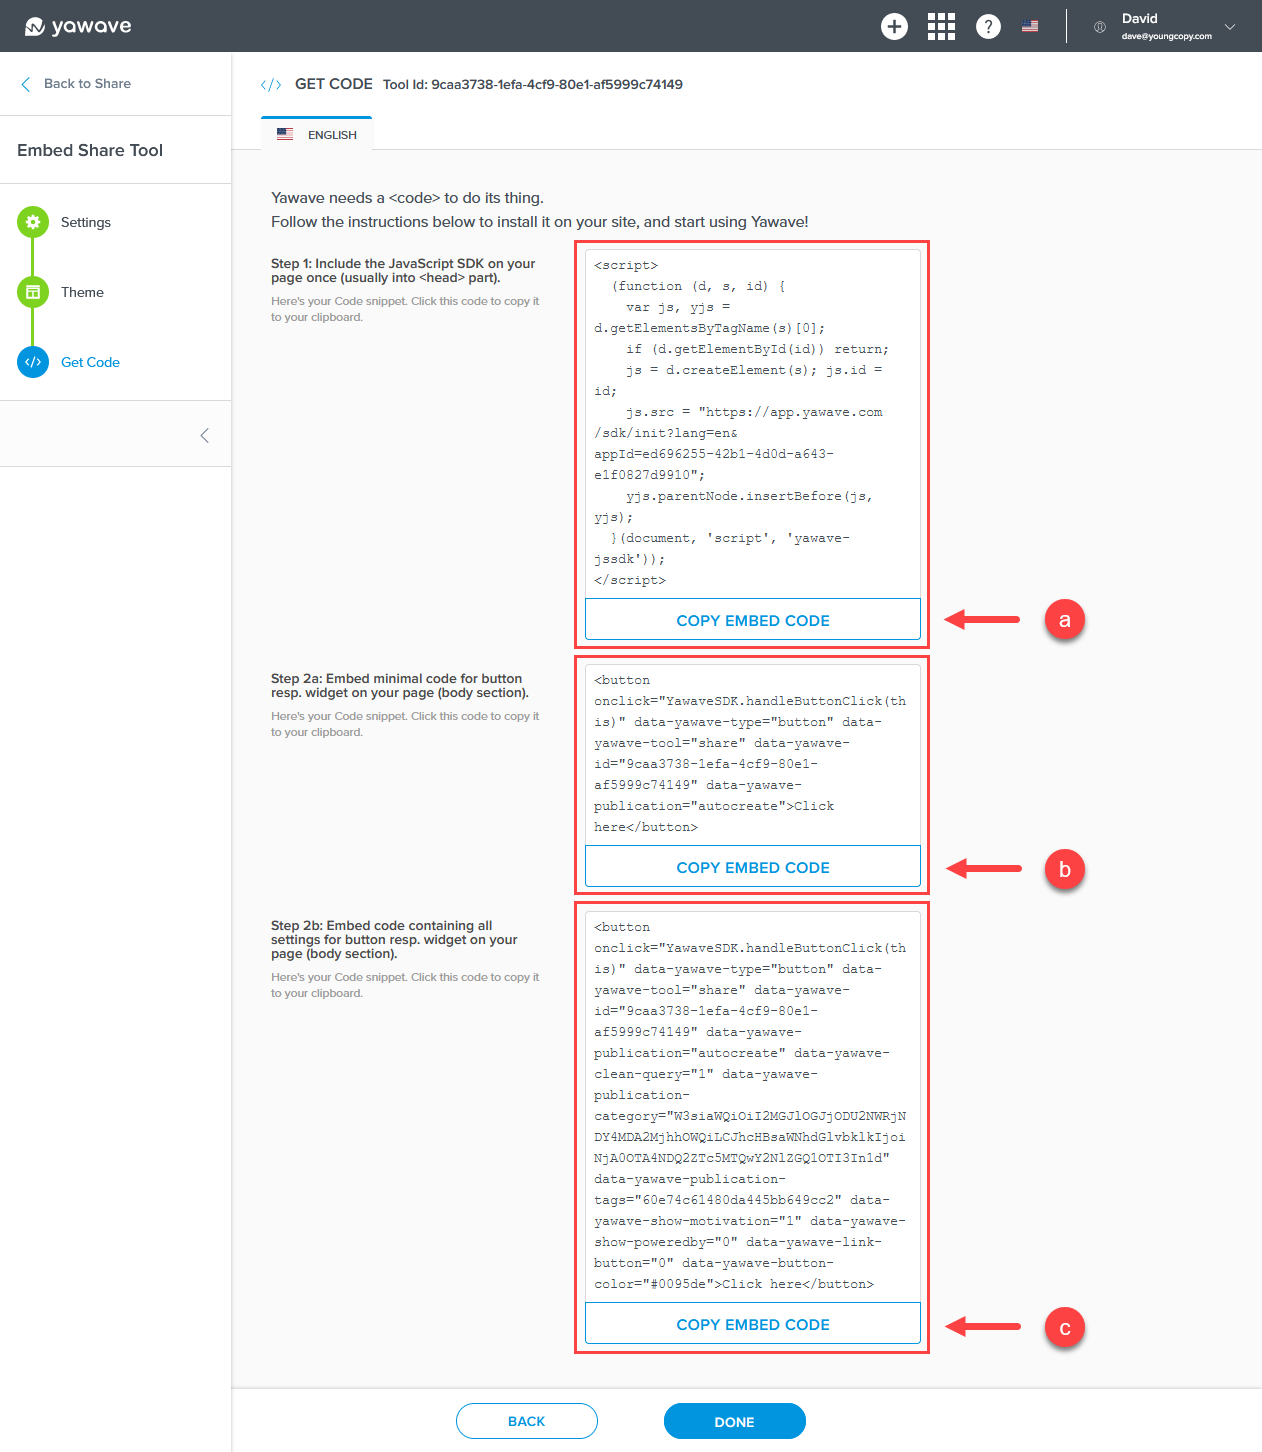
- When completed, click Done.
Embedding as a Widget
-
Click Administrate/Tools/Share Tools.
-
Click the three dot menu of the Portal you want to embed and select Embed. Note: The three dot menu is located on the far-right of your Share Tool.
-
Click Widget.
-
Configure the following settings:
-
Share Tool - The Share Tool you selected in Step 2 above should be selected for the Share Tool value.
-
Share Channel - This setting allows you to connect the Share Tool to a custom social media button such as Facebook, LinkedIn, Twitter, and more. Choose the Share Channel you want to connect your pop-up to from the Share Channel drop-down menu. Or leave this setting as the default First Active Channel.
-
Connection - Select the connection you want to use for the Connection field. Learn more about Connections in the Create a Connection instructions.
-
Publication - Select the Publication you want to use from the Publication drop-down menu.
-
Journey and Touchpoint - Journey and Touchpoint are optional and require more advanced understanding of the Yawave product. If you are already familiar with these settings and how they work, complete the following, otherwise continue to the Link to landinage page setting below.
- Select a Journey from the drop-down menu or select Add Journey to create a new one.
- Enter the name of the Journey in the Journey name field.
- Select the Visibility you want to use for the Journey from the Visibility drop-down menu.
- Click Save.
- Select Add Touchpoint from the drop-down menu.
- Enter the name of the Touchpoint in the Touchpoint name field.
- Select the Visibility you want to use for the Touchpoint from the Visibility drop-down menu.
- Click Save.
-
Link to landing page - The landing page is always the same URL as the page where you place the Share Button. In most cases this setting can be left as default.
-
Link to referral page - The landing page is always the same URL as the page where you place the Share Button. This setting is specifically used when the page is shared in an email. In most cases this setting can be left as default.
-
Click Next.
-
Configure the following settings. Note: When changing configuration settings you'll see the changes in real-time.
- Under Motivation Part Settings:
- Show Motivation part
- Powered by yawave
- Link button
- Under Share Part Settings:
- Color
-
Click Next.
-
Follow the instructions to copy and embed the Yawave generated code based on the configuration settings you chose in the steps above. Alternatively, we provide more detail below:
- For Step 1 in the onscreen instructions, click Copy Embed Code (a) and place the code in the head part of the website or application where you are embedding your Share Tool.
- Step 2a and Step 2b in the onscreen instructions give you two options. Click Copy Embed Code (b) if you want to use the settings you configured above or click Copy Embed Code (c) if you want to override what you configured above. Step 2b gives you more control. For example, you can manually change any of the embed code to the configuration settings you want. Place the code from Step 2a or Step 2b in the body of the website or application where you are embedding your Share Tool.

- When completed, click Done.